Goodness, it has been a very busy school year thus far! Fear not, I have been very busy trying out new lessons at the high school that I am working on sharing with you in the next few weeks. In addition to being extremely busy with school, I have also been hard at work creating my own artwork (I bought and re-furbished an old loom this past summer!) and I have taken on a new role at my school, assisting as a Class Advisor, and entering my fourth year as Artistic Designer for the High School Musical.
So, to get back into the swing of blogging, I have decided to share with you some artwork I made at a Summer Institute this past summer. This summer, I had the privilege of getting back in touch with my metalsmithing roots through participation in a 2 week Enameling Insititute, featuring instructors Linda Darty and James Malenda, expert metalsmiths and enamelers.
This institute was simply fabulous. For 8 hours, 5 days a week, for 2 weeks I had the opportunity to design and fabricate my own enameled jewelry. Although I was familiar with some enameling techniques before, this institute had me exploring new enameling techniques and also provided direction on how to incorporate it into a school curriculum. (Since I already teach high school metalworking and I recently acquired a small, older enameling kiln, I was pretty excited about what I would be able to take back to the classroom.)
What is Enamel?
Enameling is a centuries old metal embellishment technique that utilizes the application of powdered glass onto a non-ferrous metal surface via sifting and wet-packing techniques. Once the powdered glass has been applied to the metal it is then “fired” in an enameling kiln until the glass vitrifies and fuses to the metal surface, approximately 1350 – 1450 degrees Fahrenheit. It is an inexpensive way to add color to jewelry and metal that provides infinite design possibilities. It
Enameling Explorations
Back in college I had the privilege of attending Penland School of Crafts for a 3 week intensive class while on a work study scholarship. While there, Linda Darty (a regular at Penland who also teaches metalsmithing at East Carolina University) visited for a day. She brought with her a few of her enameling projects and I was just blown away by her use of color. The book store at Penland had a copy of her book The Art of Enameling, which I purchased. (This book is a MUST HAVE if you are serious about learning how to enamel.) Prior to the institute I re-visted and re-read the book in preparation for my 2 weeks. I created a sketchbook with sketches of jewelry I wanted to create – I wanted to try to make at least 1 piece of jewelry with each major technique.
Here are some examples of the enameling techniques I explored.
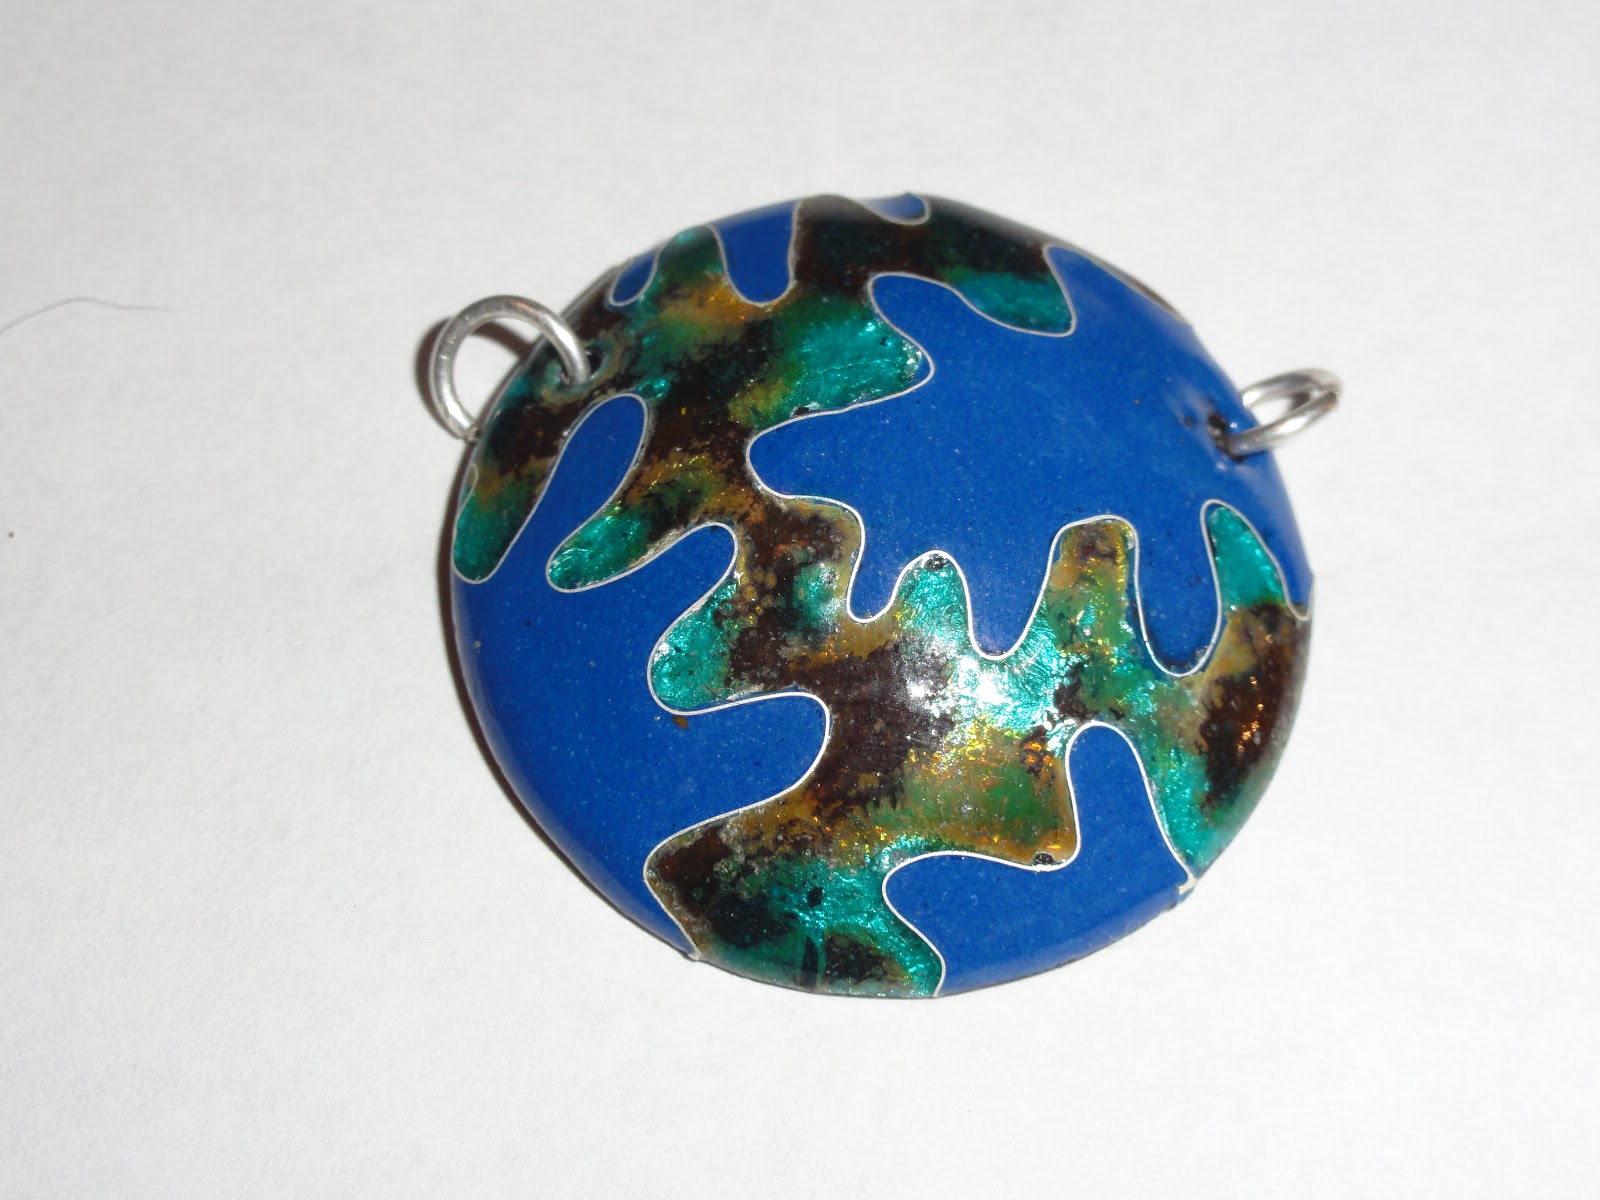 Cloisonné is an enameling technique that involves the fusing of very fine, delicate, silver cloisonné wire to enamel. It is probably the most well-known enameling technique. The wire acts not only as a separator of color, but also as a line. This technique is what Linda Darty excels in; she makes it look incredibly easy. However, I found it anything but easy. I had a very difficult time shaping the wire to specific shapes (hence why my pendent is simply squiggles.) I also had a hard time getting the wire to fuse to the domed surface of my pendent. However, once the wires were attached, I really enjoyed going back and adding the opaque and transparent enamels. In the transparent enamels I added a base of fine silver foil to make the colors brighter. (Adding silver foil to an enameled copper is also a much cheaper alternative to using actual silver sheet metal.) After finishing firing I had to go back and grind the wires down to make the surfaces flush with the enamel. It was very time intensive and with more patience and time I would probably enjoy it more. After working with the Cloisonné technique I gained an appreciation and admiration for enameling artists like Linda who can manipulate the wire to create beautiful designs and build up beautiful layers of color.
 Basse-Taille


Champleve
 Champleve is an enameling technique in which a design is etched into thicker gauge metal (I used 14 gauge). This technique can also be done by piercing a design in thin sheet metal and then sweat soldering it to a back piece. The areas that have been etched away are then filled with enamel and fired. For these pieces I created a pair of earrings and parts to a necklace inspired by Gustav Klimt. I etched the copper in Ferric Chloride (which can be purchased at Radio Shack) and then after enameling and grinding I dipped the pieces into liver of sulfur to build up the dark black finish on the exposed metal.
Simple sift is the process of sifting powdered enamel over copper shapes. The possibilities for this technique are endless. You can use simple sift in combination with home-made stencils or using rubber stamps and embossing glue. For this pair of earrings I used a zig-zag stamp with embossing glue to create the orange lines.
For the pink flower, I simple sifted white and then went back and blended transparent colors on top. The center is made with simple sift and the addition of glass threads.

Watercolor Enamels

With these earrings, I experimented with watercolor enamels, a newer enamel developed by Thompson Enamel to make enameling more accessible to school age students. (Elementary students could do this if you had pre-enameled copper pieces!) They are applied in thin layers and can be blended like watercolors. I recently purchased a set of the watercolors for my own personal endeavors and look forward to exploring them more. These earrings are reversible.
Conclusion:
All in all this was an excellent and very enjoyable summer institute. I was able to incorporate many of the techniques I learned into my 3D Design II curriculum this past year. (The students LOVED learning how to enamel!) Although I cut all of my metal shapes, I would like to encourage anyone new to enameling that you can purchase pre-cut copper shapes to enamel on. (This makes it possible to teach enameling to elementary students and larger classes!)
If you would like to learn more about organizing and teaching enameling to high school students, stay tuned! My next blog entry is going to focus on the enameling lesson I taught in the fall.
Thanks for reading!
Artfully yours,
Emily